Did you know that you can navigate the posts by swiping left and right?
How to create a cloud server to retrieve your configuration from it
25 May 2016
. category:
tech
.
Comments
#tutorial
#spring
#documentation
#cloud
When you work in a microservice environment, the configuration of all your microservices could be turned a little bit tricky, for solve this, spring provide us an infraestructure to manage all our application.
We can find into spring repositories two utilities, belonging to Spring Cloud project, Spring Cloud Server and Spring Cloud Client.
To configure our services to run under a config server, the first thing we have to do is create this server, it will be a spring boot application that connects to your prefered repository (git, svn, local…) to obtain the configuration of all your services and serve to them.
Creating the Config Server
The first thig we have to do is import the dependencies into our server:
- Maven
<dependency>
    <groupId>org.springframework.cloud</groupId>
    <artifactId>spring-cloud-config-server</artifactId>
</dependency>
- Gradle
compile group: 'org.springframework.cloud', name: 'spring-cloud-config-server'
If we create a standar spring boot application, we have when create the project a main class that should be similar to this:
import org.springframework.boot.SpringApplication;
import org.springframework.boot.autoconfigure.SpringBootApplication;
import org.springframework.cloud.config.server.EnableConfigServer;

@SpringBootApplication
@EnableConfigServer
public class ConfigServerApplication {

	public static void main(String[] args) {
		SpringApplication.run(ConfigServerApplication.class, args);
	}
}
Lets explain what you see in this class:
- SpringBootApplication, annotation that indicates to spring that we are working with an spring boot project, this annotation also inherit the annotations @EnableAutoConfiguration and @ComponentScan that allows to spring context scan all our objects.
- @EnableConfigServer indicate to spring context that we are working with a configuration server, so it will provide the configuration files retrieved from the location we put in the configuration.
Once we have our main class, we have to configure our server, to indicates it where it should retrieve the configuration, so in our application.yml we have this:
server:
  port: 8888
  contextPath: /configserver
spring:
  cloud:
    config:
      server:
        git:
          uri: https://github.com/myolnir/springconfig-repo
This configuration file sais to our server where is the repository to obtain the configuration, in this case, https://github.com/myolnir/springconfig-repo, the server when receives a configuration request search inside this github repository, obtain the file and response to the service that requested the configuration.
The contextPath configuration only adds an additional path to the server, so when an application wants to access to the server should have to do a request to http://localhost:8888/configserver
As we said we need, in our case a github repository, to retrieve all config files from it.
Our repository has this aspect

Once started our config server if we go to http://localhost:8888/configserver/sampleconfig/production we can see the production environment file and the common files for all profiles
The same will occur with the other files.
Now is time of configure our config client
Creating the Config Client
As the config server, the first thig we have to do is import the dependencies into our application:
- Maven
<dependency>
    <groupId>org.springframework.cloud</groupId>
    <artifactId>spring-cloud-starter-config</artifactId>
</dependency>
<dependency>
    <groupId>org.springframework.boot</groupId>
    <artifactId>spring-boot-starter-actuator</artifactId>
</dependency>
- Gradle
compile group: 'org.springframework.cloud', name: 'spring-cloud-config-client'
compile group: 'org.springframework.boot', name: 'spring-boot-starter-actuator'
In this case we can see that get also the actuator dependency, adds some extra endpoints to our application for the purpose of providing various metric data, it is very useful for the production environment as there are several endpoins that check the status of the application, settings, error pages, version details among others, also allows to us call to the /refresh endpont that we will see an the end of this tutorial.
Now we create a new spring boot project, this time will be a service that consumes the configuration that we configuration server provides.
The main class for our clien application will be:
import org.springframework.boot.autoconfigure.SpringBootApplication;
import org.springframework.cloud.context.config.annotation.RefreshScope;
import org.springframework.web.bind.annotation.RequestMapping;
import org.springframework.web.bind.annotation.RestController;

@SpringBootApplication
@RefreshScope
@RestController
public class ConfigClientApplication {

    @Value("${spring.hello.name}")
    String name;


    @RequestMapping("/hello")
    String hello() {
        return "Hello " + name + "!";
    }

	public static void main(String[] args) {
		SpringApplication.run(ConfigClientApplication.class, args);
	}
}
In this time we create a common spring boot application, that exposes an endpoint that the only thing to do is print a string and a variable that we obtain from our configuration server.
Also we see a new annotation @RefreshScope indicating to Spring Boot we can perform a refresh configuration from our config repository. We can change the configuration file on our config repo, commit it to github and then refresh the context of our application and the values refresh automatically. We explain this later.
The most important thing we have to consider when create an application that retrieves its configuration from a configuration server is in its configuration file, normally in spring we have a configuration file called application.yml, this configuration file its loaded during the spring context loads, but now all our configuration are stored in the server so we need load before the context this configuration, for that we create a configuration file named bootstrap.yml, this file loads before the spring context that it is what we want.
In this file the only thing we have to configure is how is the application named, to the config server could retrieve the correct files from the repository and the most important, WHERE is located our configuration server.
spring:
  application:
    name: sampleconfig

  cloud:
    config:
      uri: http://localhost:8888/configserver
As we can see the uri indicates where is our config server, in this case is running in local.
When our client application wants to load any of the configuration (in this simple case only the @Value(“${spring.hello.name}”), the application made a request to the config server, this retrieves the information according this pattern:
http://localhost:8888/ {name} / {env} / {label}
- {name} is the file name in the repository (it corresponds to the application name in our case, sampleconfig)
- {env} is the file profile (the value default is not to report a profile file)
- {label} the branch of the file repository (optional being the default: master)
If everything is correctly configured when we start our client we can see a log with something like this:
Fetching config from server at: http://localhost:8888/configserver
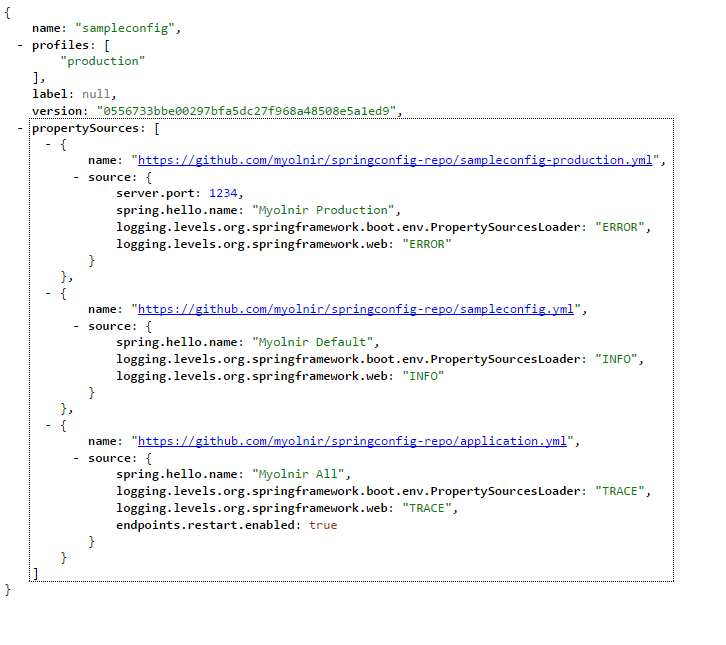
Located environment: name=sampleconfig, profiles=[production], label=null, version=0556733bbe00297bfa5dc27f968a48508e5a1ed9
Located property source: CompositePropertySource [name='configService', propertySources=[MapPropertySource [name='https://github.com/myolnir/springconfig-repo/sampleconfig-production.yml'], MapPropertySource [name='https://github.com/myolnir/springconfig-repo/sampleconfig.yml'], MapPropertySource [name='https://github.com/myolnir/springconfig-repo/application.yml']]]
The following profiles are active: production
Refreshing org.springframework.boot.context.embedded.AnnotationConfigEmbeddedWebApplicationContext@64e7619d: startup date [Wed May 25 12:57:16 CEST 2016]; parent: org.springframework.context.annotation.AnnotationConfigApplicationContext@5b8dfcc1
Tomcat initialized with port(s): 1234 (http)
A few things we can see in this log is that the client could connect to the config server, in this case we indicate to our application that we are in a production environment with the flag spring.profiles.active=production, so our server get the configuration from the file https://github.com/myolnir/springconfig-repo/sampleconfig-production.yml
In this file that has this aspect:
server:
  port: 1234
spring:
  hello:
    name: Myolnir Production
logging:
  levels:
    org.springframework.boot.env.PropertySourcesLoader: ERROR
    org.springframework.web: ERROR
We can see in the log that the port in which the application is starting is 1234, that is the port that is configured in the production file.
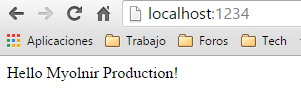
If we go to our browser and made the call http://localhost:1234/ we will see:
@RefreshScope annotation
This annotation, as we explain above, allows to our client refresh its spring context without restart their embebbed tomcat. To do that, we have put this annotation in our main class and call to the /refresh endpoint making a post request (we’ve talked of it before when explanin the actuator dependency) and if we make again the call we can see the changes.
For example, in our sampleconfig-production.yml we have this:
server:
  port: 1234
spring:
  hello:
    name: Myolnir Production
If we make the call http://localhost:1234/hello we will see in our browser:
Hello Myolnir Production!
Then we make a change in the file leaving it:
server:
  port: 1234
spring:
  hello:
    name: Myolnir Production refreshed!!!
And made the call again, and…., nothing has been changed!!!, this is because we don’t refresh our client application context, to do that we have make a POST request to our /refresh endpoint, this endpoint make again a call to the server config and retrieves all the variables that has changed and refresh the spring context.
curl -XPOST http://localhost:1234/refresh
Now if we make the call again, we can see in our browser this:
Hello Myolnir Production refreshed!!!
You can take a look to the code of this tutorial in my github repository
I hope you have enjoyed with this tutorial.
See you next time.